"How to transfer videos from my iPad/iPhone to PC or Mac? Both the recorded videos and downloaded movies (large and long) take up too much storage space device!"
With fascinating cameras and HD screens, iPad and iPhone are perfect for recording videos and watching movies, TV Shows, concert videos, etc. The only thing is your iPad's insufficient storage. To keep the videos and free up space, it's best to copy the videos to computer and then delete them on device.
But how can you transfer videos from iPad/iPhone to PC or Mac efficiently? Here I'll show you the best 7 ways.

Overview:
Here is a quick preview table to let you know the key features of these 7 solutions.
1. Phone Manager (Win & Mac) - Fast; support videos that are downloaded from all sources; transfer Movies, Music Videos, Home Videos, TV Shows, iTunes U, Podcasts, Camera Roll to target folders; delete items to free up space on iPad/iPhone
2. Photos app or AutoPlay (Win) - Takes patience; Steps are various on Win 7, 8, 10
3. Photos app (Mac) - Easy to use; Can't import iTunes synced videos back to Mac
4. Windows Explorer (Win) - Only import and export media files from Camera Roll to PC
5. iPhotos (Mac) - Only migrate media files stored from Camera Roll
6. Image Capture (Mac) - Good; only move videos and photos
7. iTunes (Win & Mac) - Only transfer Apple Store purchases
Way 1. Transfer Videos from iPad/iPhone to PC/Mac with Phone Manager
Way 2. Copy Videos to PC from iOS with Photos app (AutoPlay)
Way 3. Import Videos from iPad to Mac Using Photos app
Way 4. Export Videos from iPad iPhone to PC with Windows Explorer
Way 5. Import Videos to Mac from iPad/iPhone with iPhotos
Way 6. Send videos to iMac from iOS device with Image Capture
If you're looking for a fast and easy solution, check FoneCope Phone Manager. Not only can it import videos from Camera Roll but also other folders such as Movies, TV Shows and more.
In addition to transferring big size videos fast, it also can organize your video list and conveniently remove them from your iPad/iPhone on computer to free up space. Moreover, it can easily import photos from PC back to iPad without iTunes.
And it provides 2 versions: Windows and Mac.
Step 1. Plug your iPad or iPhone into PC/Mac with USB
Download and launch FoneCope Phone Manager on your computer first, then connect your iOS device to PC/Mac with a USB cable. As soon as they are connected, this software will start scanning and recognizing data on your device.
Step 2. Copy videos from iPad iPhone to computer
Click "Videos" on the top bar and check your videos saved in Movies, Music Videos, Home Videos, TV Shows, iTunes U, Podcasts, etc. Preview and select the videos and movies you need, and then click "Export" > "Export to PC" to save your videos to PC from iPad or iPhone. After that, this iOS transfer tool will start copying.
(On iMac, click "Export" and choose "Export to Mac".)
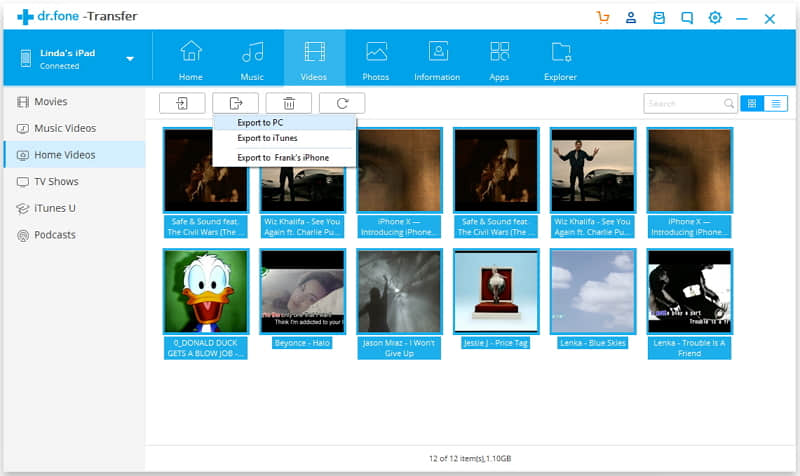
Tip: if you want to sync videos to iTunes, you can choose "Export to iTunes".
Step 3. Import camera recorded videos to PC from iOS device
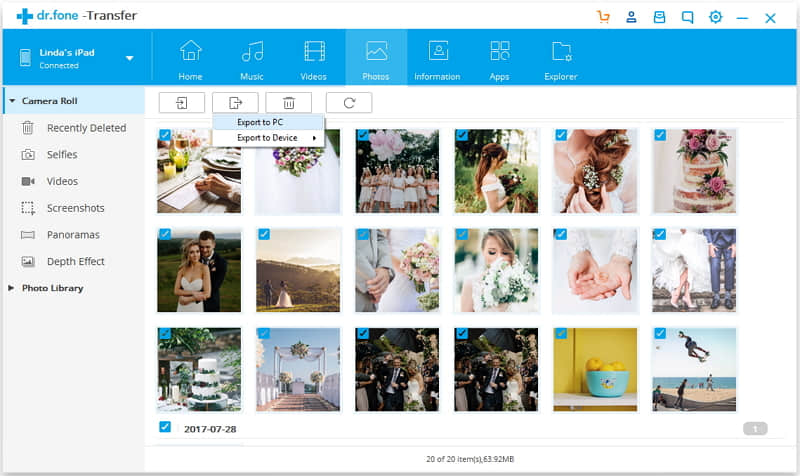
The videos recorded with iPad or iPhone camera will be stored in the Camera Roll. So, you need to click "Photos" in the top bar and find your videos under this folder.
Now select what you want and click "Export to PC".
Step 4. Choose a folder to save your videos
A window will appear asking you to choose a target folder to save videos.
Isn't it so easy to transfer videos from iPad to PC and transfer movies from iPad to iMac?
Plus, it also can transfer photos and videos from Samsung to Mac.
You don't have to download assistant software as Microsoft already provides one on your Windows PC. You can easily get videos to PC from iPad.
But the downside is, if you've used iTunes to sync some videos from computer to iPad/iPhone, this method won't allow you to import those videos back to your PC. Now, let's see how to transfer videos from iPad to PC.
Note: iTunes on your PC must be iTunes 12.5.1 or later.
Step 1. Connect your iPad, iPhone, or iPod Touch to computer via USB. (Make sure you unlocked your device's screen with password.)
Step 2. If you receive a "Trust this computer" message, tap Trust or Allow on iOS device.
Step 3. Open the app.
For Windows 10 (the Photos app)
Click the "Start" button > select Photos to launch the Photos app > select Import > From a USB device > follow the on-screen instructions
For Windows 8 (the Photos app)
Open the Photos app > right-click within the app > click "Import" > select your iPhone or iPad

For Windows 7 (AutoPlay)
It should automatically prompt you with the AutoPlay dialog > select "Import pictures and videos using Windows" > click "Import"
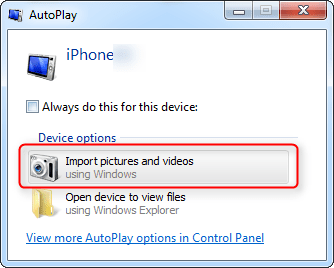
(If the AutoPlay does not launch automatically, click the Start button, select Computer, then right-click your iPad or iPhone, and select Import pictures and videos.)
Step 4. Check and select the videos that you want to transfer.
Tip: The app would smartly search for all videos and pictures that it hasn't imported before and selects them.
Must know:
If you've enabled iCloud Photos on device, it's necessary to download the original versions (full resolution) of videos to iPad or iPhone first.
What's more, some files could be rotated incorrectly. In this case, you'll need to add them to iTunes so that you can play in the correct orientation.
Also, the Photos app is available on Mac OS computer as well. Still, you cannot transfer the videos and photos that you've synced to your device from your computer with iTunes before.
Step 1. Update your iTunes to the latest version.
Step 2. Plug your iPad or iPhone to Macbook with a Lightning cable. (Make sure your device's screen is unlocked.)
Step 3. On iDevice, tap Trust if you see a "Trust This Computer" prompt.
Step 4. On Mac, the Photos app is supposed to be automatically launched. If not, you'll need to manually open it.
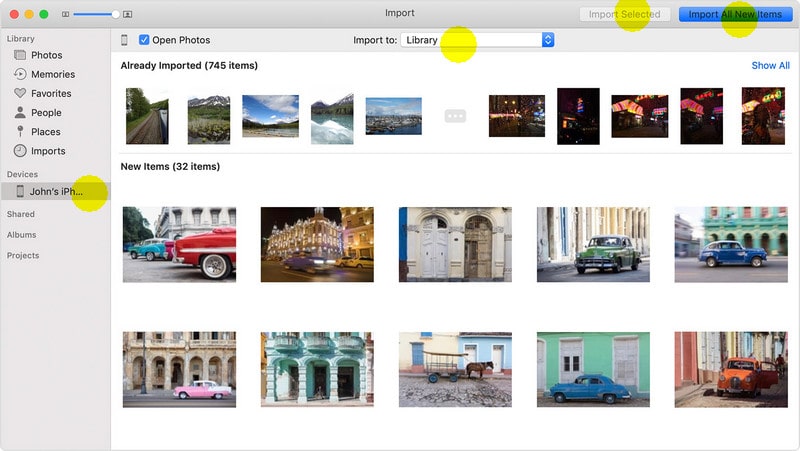
Step 5. After that, you'll see an Import screen displaying all the videos and pictures that are stored on your iPad/iPhone. (If it doesn't appear, you can locate the top and manually click on your device's name or the Import tab.)
Step 6. Preview and select the videos that you want to copy to your Mac, and then set the destination folder by clicking "Import to", lastly, click "Import Selected".
Tip: Click "Import All New Items" if you don't want to take time to select your videos.
This method can help you import Camera Roll videos and photos from iPad/iPhone to computer. However, your videos are saved in several folders in disorder. It could be a little bit troublesome if you've got dozens of videos.
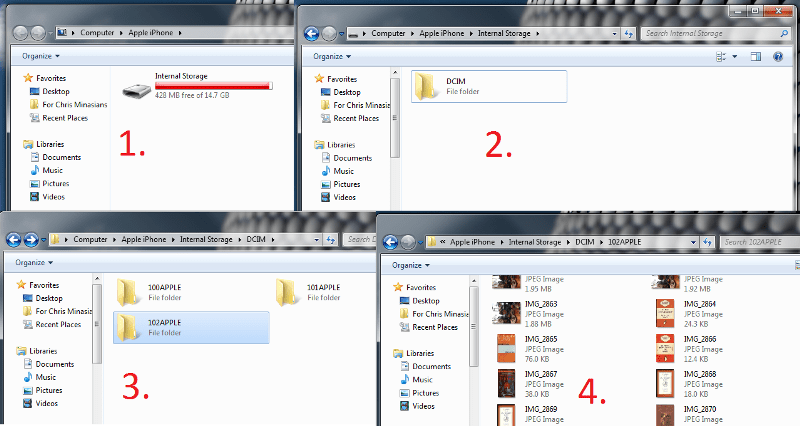
Here are steps to transfer videos from idevice to PC.
1. Plug your iPhone/iPad to PC via a USB cable.
2. Find "Computer" and then double-click the device icon.
3. Open "Internal Storage > DCIM" and you can see the folders that contain videos on your iPhone or iPad.
4. Select and transfer videos from iPad to any folder on your PC.
iPhoto, pre-installed on Mac, is a program that can help you transfer videos and photos between iPad/iPhone and iMac.
The problem is, it can only transfer videos from Camera Roll, where saving videos and photos shot by your device's camera. It means that you cannot use it to copy movies and TV shows downloaded from internet resources to Mac.
Step 1. Connect your iPad/iPhone to iMac
Use a USB cable to connect your iOS device and Mac OS computer. Once your Mac detects your iPad or iPhone, you can open iPhoto and find your device's name in the left column.
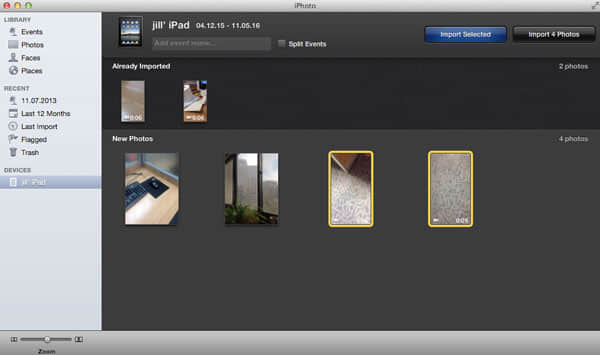
Step 2. Select video and import to iPhoto
Select the videos you want to upload to computer, and then click "import selected" to transfer videos from iPad or iPhone to iPhoto library.
Step 3. Transfer videos from camera roll to Mac
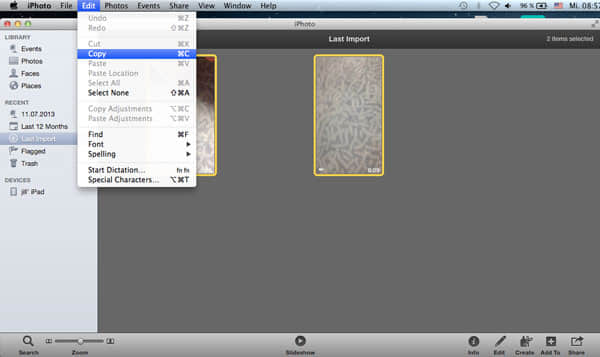
In the left toolbar, click "Last Import" and go to the top toolbar to find "Edit", click "Copy" in the drop-down list.
Step 4. Next, go to "Finder" on your iMac, click "Edit" and choose "Paste X items".

A few minutes later, you can see the transferred videos on your Macbook.
It's a pre-installed program on Mac, too. This is also a good assistant to transfer iPad/iPhone videos to Mac. Here are the steps on how to use the Image Capture to backup videos to Mac.
Step 1. Connect iPad/iPhone to computer after you run Image Capture on Mac.
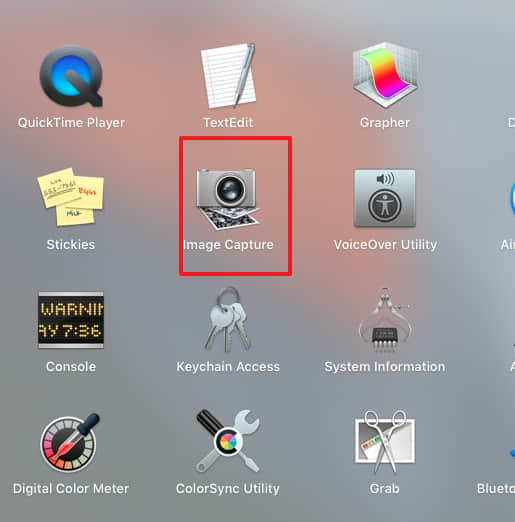
Step 2. Select iPad/iPhone on the left panel, and then all videos and photos will be displayed on the right for you to preview.
Step 3. Set a target folder to save your imported videos by clicking "Import to".
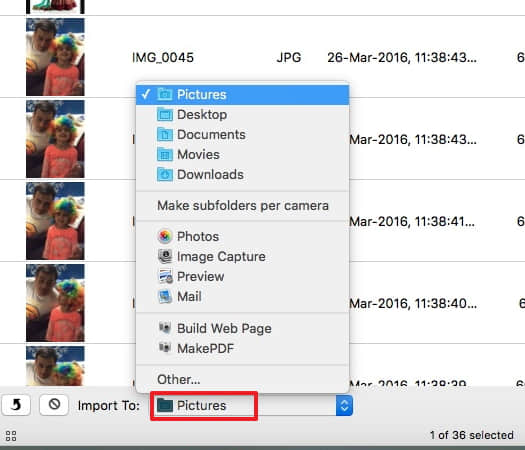
Step 4. Select the videos and click "Import" to start copying.

You can see a tick mark if the item is successfully transferred to Mac.

iTunes is available on both PC and Mac. And you can use it to transfer videos from iPad/iPhone to iTunes library on computer. But due to copyright, only the purchased videos are available to be imported.
Therefore, don't use iTunes unless you have had many movies and mp4 from iTunes Store. iTunes is not recommended since you can't transfer videos downloaded from other resources.
Step 1. Update your iTunes to the latest version and then connect your iOS device to computer with USB.
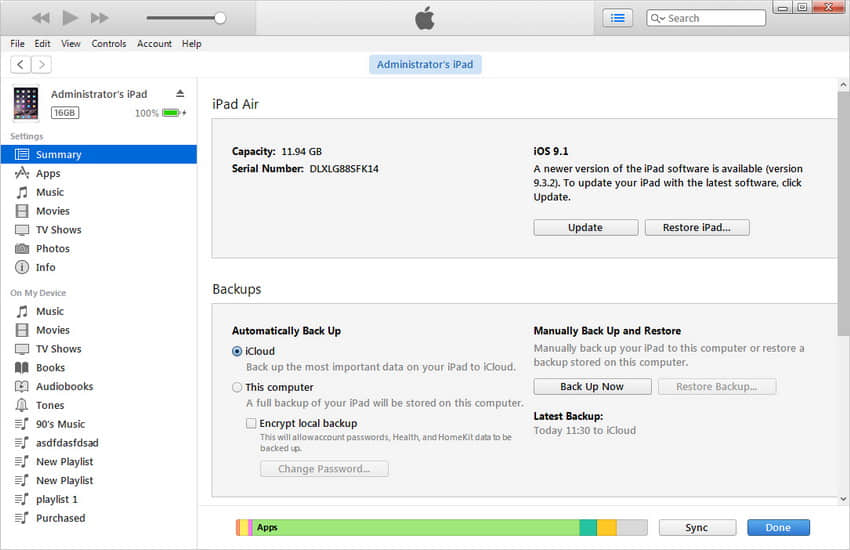
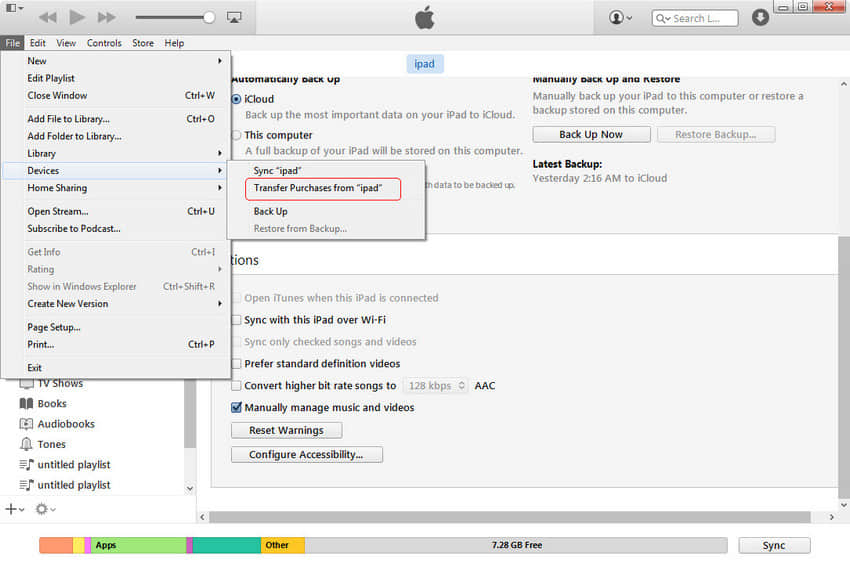
Step 2. Select File > Devices > Transfer Purchases from iPad/iPhone on the left
This article lists the best 7 solutions to help you easily transfer videos from iPad and iPhone to PC and Mac. I did thorough researches and I'm convinced that you can find a way that fits you!
I hope this post can help you! Let me know your feedback by leaving a comment below. I value your voice. Thank you very much!