"How do I transfer photos from PC to iPhone without iTunes? I just got my 256GB iPhone XS Max and want to copy more than 2500 jpgs & pngs to device. Tried iTunes, but it would not sync."
Generally, iTunes is the first choice that you'd consider when need to get pictures from PC to your iPhone. However, even as a sophisticated data transfer application, iTunes is still lack of adequate flexibility for catering to the public. And the procedures of photo transfer are so fixed that iTunes will be not so convenient in some cases.
Therefore, to cover up, we have sorted 5 methods to transfer photos from computer to iPhone without iTunes.
Part 1. Common Methods to Get Pictures from PC to iPhone without iTunes
Part 2. Fast Transfer Photos from Computer to iPhone without iTunes
To break through the poor flexibility of iTunes, we have sorted out several more convenient and safe ways to copy photos from PC to iPhone without iTunes, so let's take a shot!
If you are not willing to use iTunes as the war for transferring photos from PC to iPhone, iCloud will be your second choice. iCloud, another affiliation of Apple, can provide 5GB storage for backing up users' data for free, including photos, music, message, etc.
Cons: iCloud takes much time to sync than iTunes
Step 1. Download and install iCloud on your PC.
Step 2. Launch it and navigate to "Photos", click "Options".
Step 3. Check "iCloud Photo Library" and click "Done", and then "Apply" to turn on iCloud photos.
Step 4. Locate "Favorites", select "iCloud Photos" and then click "Upload".
Step 5. Select pictures you want to transfer and then click "Open".
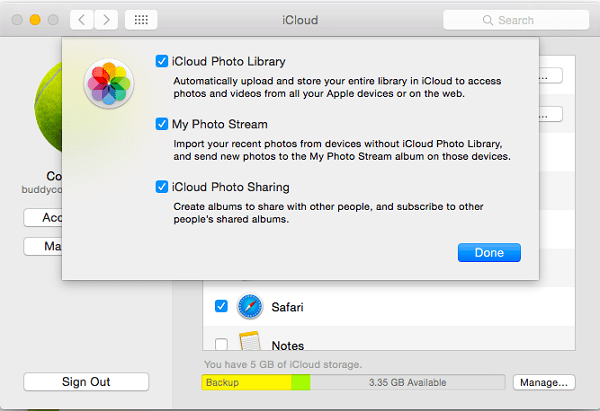
Tips: Turn the iCloud off on your PC and turn it on again, which do help to prompt the syncing progress.
You can check the iCloud photos on your iPhone now.
Google Photos is also a good alternative to put/get pictures from computer to iPhone without iTunes, but the prerequisite is that you have to sign in a Google account, or the method will fail to work. It is noteworthy that, there is no limit for storing space, but each picture is up to 16 megapixels.
If you don't mind losing the original quality of your photos, try this method.
Firstly, upload photos from PC to Google Photos:
Step 1. on your PC, go to photos.google.com, sign in your account and go to Google Photos.
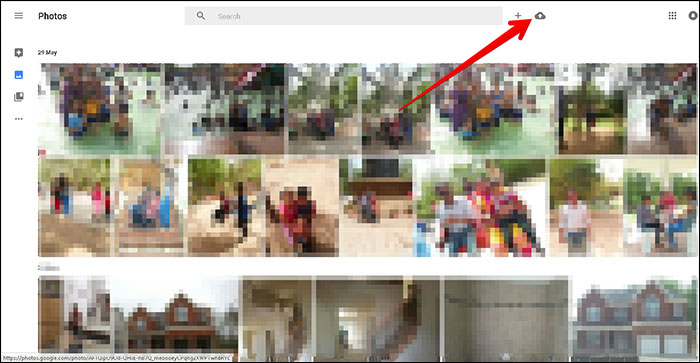
Step 2. Click the Upload button on the top right corner, choose photos to upload. (If you want to group the pictures, create a new Album before uploading.)
Secondly, download photos from Google photos to iPhone
Step 3. On your iPhone, go to the App Store, and then install Google Photos app.
Step 4. Once finishes, locate top left and tap the button to open menus. Select Collections to display all your pictures on Google Photos.
Step 5. Tap the album you just uploaded. On the top right corner, tap the 3 dots button, and choose "Select" when the menu appears at the bottom.
Step 6. Tap the upload icon at the top.
Step 7. Tap the Save Images icon.
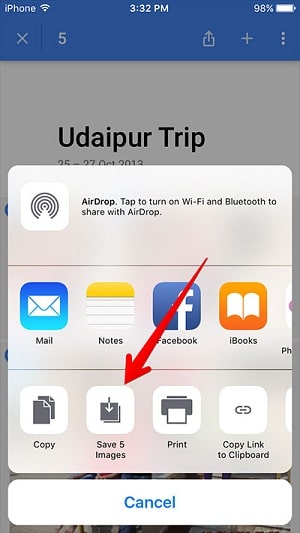
And you have uploaded/downloaded photos from computer to iPhone without iTunes successfully.
Dropbox offers you 2 GB for free to store your files. But that's surely not enough, I guess. And it'll say $8.25 each month for 1TB. And that's not so cost effective. If you only got a small bunch of pictures to import from PC to iPhone without iTunes, you can use Dropbox.
On your PC:
Step 1. Install desktop Dropbox app on PC, then sign in your account (create a Dropbox account if you're new).
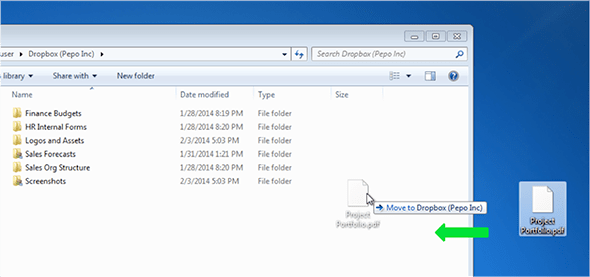
Step 2. Launch Dropbox. Then copy and paste the pictures you want to transfer from PC to iPhone in the Dropbox folder.
Step 3. You can find the folder: C:\Users\YOUR NAME\Dropbox
On your iPhone:
Step 4. Install Dropbox from App Store and open it. Then log in your account.
Step 5. Select Photos option and choose the pictures you want to transfer.
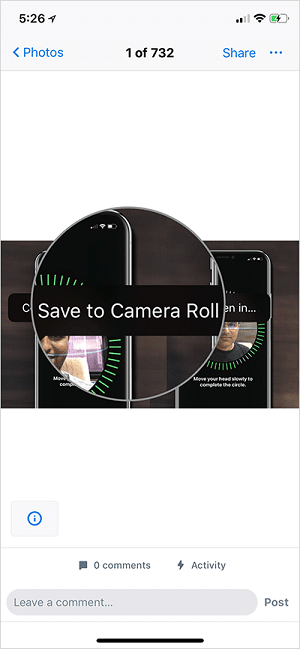
Step 6. Tap and hold the image for 1 second, tap Save to Camera Roll in the options to add photos from computer to iPhone.
Simply, you can try to transfer photos from laptop to iPhone without iTunes by sending e-mail. But remember that because the following steps are so mechanical and limited that you're not supposed to use this method when you have hundreds of pictures to move.
Step 1. On PC, create a new folder and drag all the photos you want to transfer into it.
Step 2. Compress the photos into zip.
Step 3. Log in your e-mail account and send e-mail to yourself with an attachment (zip.)
Step 4. On iPhone, log in email and download the attachment and then you can receive the photos on your iPhone.
Of course, the methods above are not efficient enough, especially in the case of transferring photos in batches. So, to do it fast, you can seek help from a professional tool.
Here you can try FoneCope Phone Manager, which is designed as a file manager focusing on files management such as photos, music, videos, messages, explore files, manage app, etc. More importantly, its multidirectional transfers give itself an edge to attract thousands of users to adopt it.
Tip: It also supports Android, for example, transfer photos & videos from Galaxy to Mac
For how to move photos from PC to iPhone with iTunes Alternative – FoneCope
Step 1. Plug your iPhone to your PC with a lightning cable. Once connected, tap "Trust" on device screen to Trust This Computer.
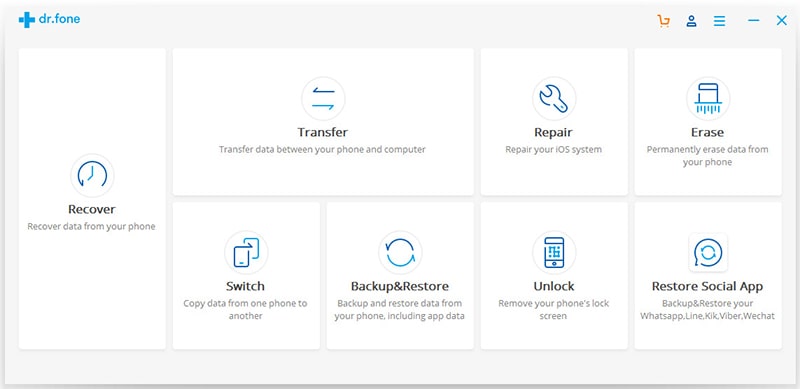
Step 2. Click on Photo section on the top.
Step 3. Click on Add File at the first option or you can choose Add Folder to import in batch.
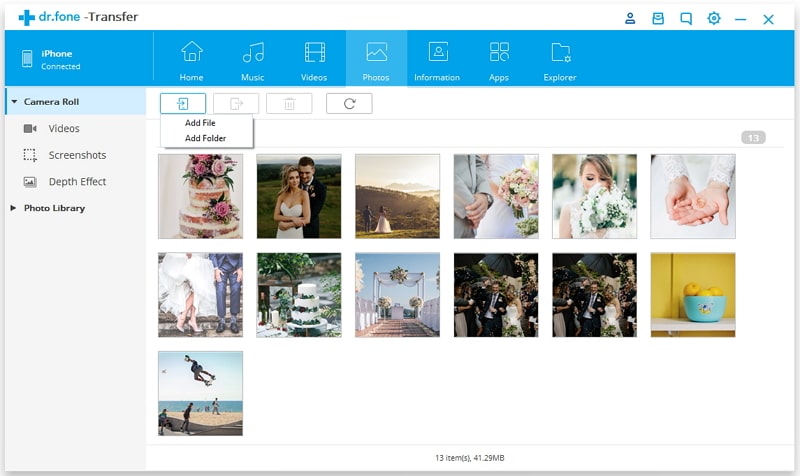
Step 4. Select the pictures you want to move to iPhone and then click on OK when you have made your decisions.
Reversely: for exporting photos from iPhone to PC
This tool also allows you to transfer photos from iPhone to PC as well as transferring videos from iPad to PC.
Step 1. Reversely, tick the photos you want to export.
Step 2. Navigate to Export option and choose where you want to export (to PC or to iTunes).
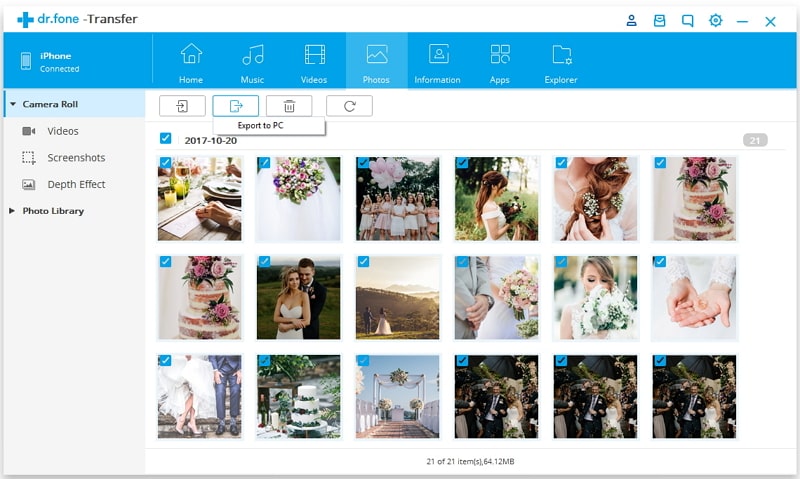
Step 3. Then just wait for the finish of the transfer.
We have mentioned that transfer photos from PC to iPhone using iTunes will cover the previous sync conditions, but if you don't mind such change, you can go ahead:
Step 1. Connect your iDevice to PC with USB and then launch iTunes on your PC.
Step 2. Follow the ordered operations shown in the picture: Device > Photos > Sync Photos > Select > Apply
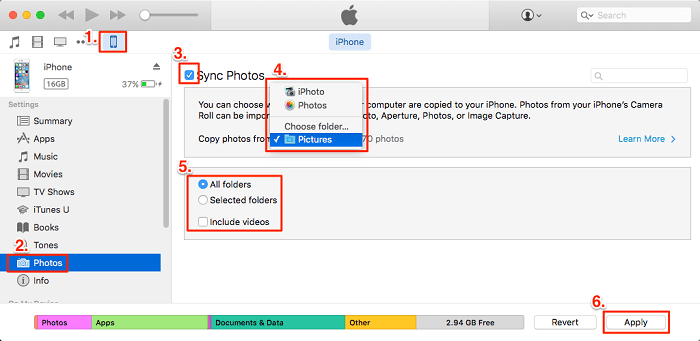
Step 3. If you have turned on iCloud Photo Library before, you will get a prompt "iTunes can't sync photos because iCloud photos on" as below:
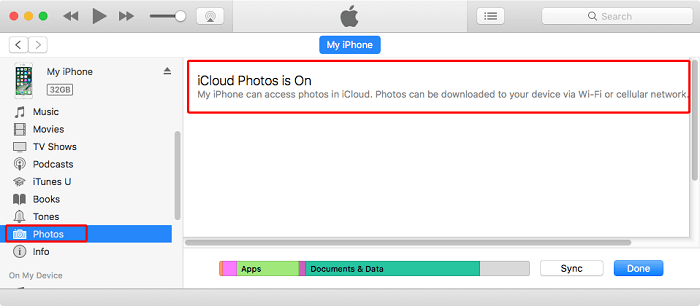
There are 3 approaches to fix this problem:
Approach 1
Go Settings on your iPhone and find Apple ID > Go iCloud, Photos and then iCloud Photo Library > Slide the button to turn off iCloud Photo Library and choose Remove from iPhone or Download Photos and Videos.
Note: Because this approach will delete all photo track in iCloud or you have to store all the photo in your iPhone at once, the data safety is not ensured or the burden is too heavy to shoulder, therefore, approach is provided if this one is not suitable for you.
Approach 2
Add new photos to iCloud on your PC > Launch iCloud on your iPhone and now you can preview the newly added photos.
Approach3
Turn on the alternative sync function of iTunes and sync photos from PC to your iPhone.
Generally speaking, transfer photos from PC/computer to iPhone is a very daily and necessary operation, so when choosing the most suitable method, it's better to consider your own needs. If you only transfer a few pictures, you can choose a slightly simpler method to save time. On the contrary, installing professional software can rescue you if you've got tons pictures and videos to manage.
That's the content of this post. If you have any better ways, please leave a message to let us know.